Coding audio and video
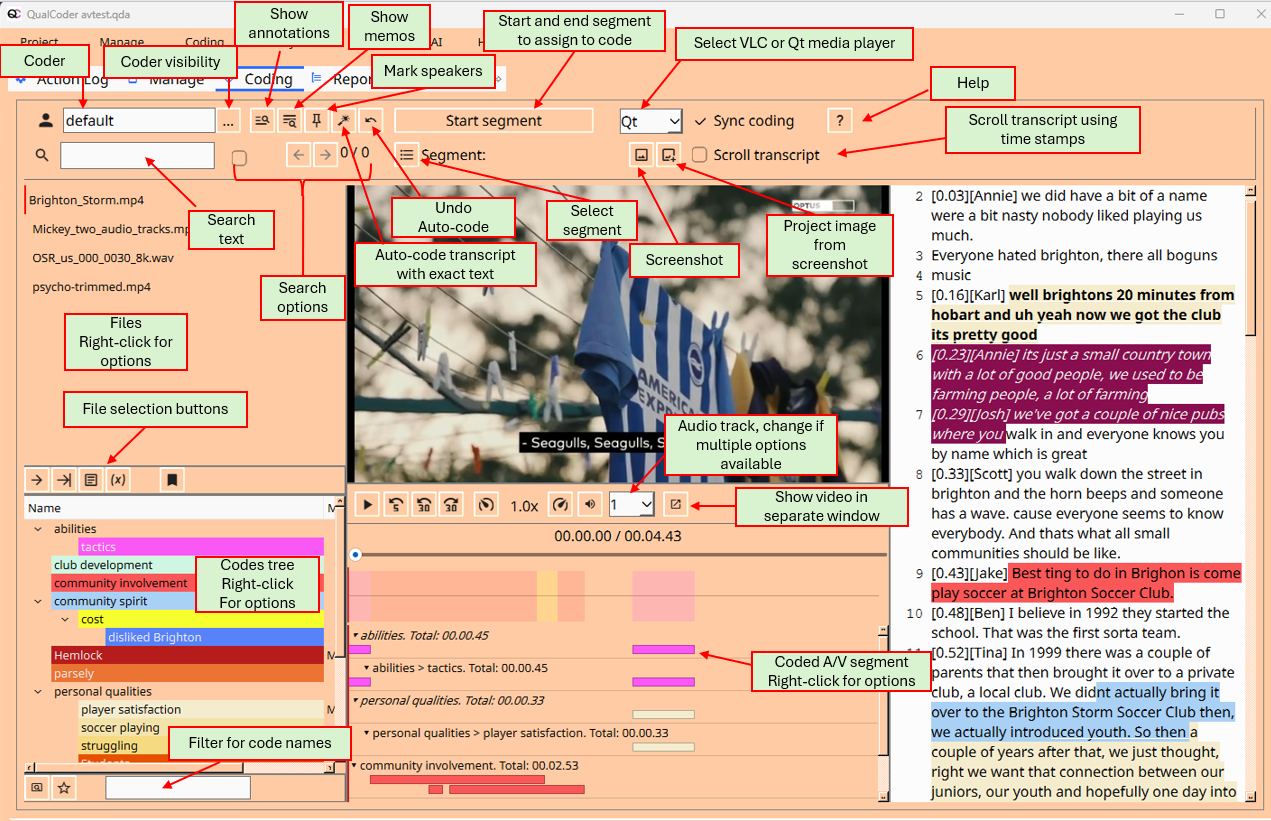
When coding video, two screens are displayed, as shown below. One screen has the video playing. The other main screen has the controls and a button to begin and end a coded segment. The controls window shows the codes in the bottom left pane and the .transcribed file text is shown in the bottom right pane. When coding audio, only the main screen is shown.
The transcription text can also be coded and annotated in this window. Right-clicking on a timestamp in the transcription will give you a menu option to go to that section of the video. If a video has multiple audio tracks, you can change the audio track too. Checking the scroll checkbox allows the transcript to scroll in time with the video, based on detected timestamps; however, you need to uncheck the scroll to be able to code the transcript.
Keyboard shortcuts
- Ctrl R Rewind 5 seconds
- Alt R or Alt Minus Rewind 30 seconds
- Alt F or Alt Plus Forward 30 seconds
- Ctrl P or Ctrl D will stop/start (play/pause). When resuming the audio/video rewinds one second.
- Ctrl S will start/end A/V segment creation.
- Ctrl Shift < will slow the play rate down to a minimum of 0.1
- Ctrl Shift > will increase the play rate up to two times.
- Ctrl Z Restores the last unmarked coding.
(These options are also available through the toolbar icons.)
When the text area has focus:
-
Shortcut A. Press A to Annotate selected text
-
Shortcut L. Press L to 'Show codes like', to show a shortlist in the codes tree.
-
Shortcut M. Press M to memo a code. (Must click over a coded text segment)
-
Shortcut O. Press O to cycle through overlapping codes in situ. (Must click over an overlapping codes segment - denoted with an overline).
-
Shortcut Q. Press Q to Quick code with the most recent code. (Must have a text selection)
-
Shortcut R. Press R to select Recent codes. (Must have a text selection)
Audio Video segments
Once a segment is made using the Start segment/Stop segment button, this can be assigned to a code by right-clicking on the relevant code and assigning the segment.
Coding stripes for the coded segments are shown in the lower area. Hovering the mouse over each stripe shows the code name, time segment, and any memo attached to that coded segment. Right-clicking on a coded segment stripe shows a menu that can be used to edit the memo, flag as an Important segment, or delete the coded segment.
The transcript text can also be coded and annotated in this dialog. However, when the Scroll transcript check box is checked, this cannot be performed. Playing the video when this is checked will scroll the transcript using the timestamps in time with the video.
Important coded text and segments
Important coded texts, such as exemplars for a report, can be flagged Important by using the right-click menu when on the coded text and selecting Important. Similarly, code segments can be flagged Important. At the top of the screen is a button with a star symbol. This toggles between showing all coded text and segments or Important coded text and segments.
Linking text to coded segments
Select text (it can be coded or preferably uncoded), then assign it to a segment. First, select the text. Then right-click the segment stripe to open the menu. Choose Link text to segment, to assign the text.
Modifying code positions in the text area
When in the text area, click on a code with the mouse (Note: the code must not overlap with another code at that position). Press the following key combinations to extend or shrink the coded text segment.
- Shift + left arrow Extends coded text to the left
- Shift + right arrow Extends coded text to the right
- Alt + left arrow Shrinks coded text from the right-hand side towards the left
- Alt + right arrow Shrinks coded text from the left-hand side towards the right
You can also right-click on a code and select change start position or change end position using the handles.
You can also export a screenshot. The screenshot will be saved as Frame_yyyymmdd_hh_mm_ss.jpg. You can save a screenshot for image coding within the project.
Convenience buttons underneath the files list
- Load the next file
- Load the file with the latest coding
- Open the file memo of the selected file
- Use a filter function show only those files that meet certain criteria. These can be from file attributes or if files are associated with certain cases.
Audio and video problems on some operating systems
Fedora does not work with the audio and video.